2013年11月9日星期六

[教程][Git] 以Git Subtree 代替 Git Submodule

【何时用Submodule?】

比如说你有一个Git repo (repository ,下同)叫做web-project
然后你的web-project 需要用到另一个git repo 叫做 web-plugin
git 的 submodule 就能管理你的 子-repo ,也就是在 web-project 内clone web-plugin ,然后你能管理、维护,就像操作普通git repo一样

可是git submodule 有点..
反正就是不太被大众欢迎,原因有很多.. (Google 下就有了)

然后就有了 git subtree

注:本文章需要先了解Git

【使用Git Subtree】

很简单
现在有一个local repo ,名叫 subtreetest
有一个文件叫做 readme.md
和一个commit history
image

还有另一个repo
叫做 testing
(我把它push 到github 上了 - https://github.com/garyng/testing
image

【添加子repo】

现在我要在我的subtreetest 的 repo 内引用 testing 这个repo
运行
git subtree add --prefix=testing https://github.com/garyng/testing.git master –squash
会看到这个:
image

其中的
--prefix 就是子目录的名称
--squash 代表将子repo的所有commit都挤成一个commit
现在subtreetest这个repo的目录已经变成了:
image
testing 目录下:
image

【pull下子repo的更新】

到testing 这个repo 做几个edits
然后在push
image

现在 testing 已经更新了
如果到subtreetest 跟新它的子repo (testing),像这样:
git subtree pull --prefix=testing https://github.com/garyng/testing.git master --squash
image

然后commit history 就变成了
image

【用remote name 减少命令输入量】

有没有发现到需要输入的命令都很长?
现在将testing 的 pull/push URL 加入remote:
git remote add testing https://github.com/garyng/testing.git
image

加入subtree 的命令就成了:
git subtree add --prefix=testing testing master --squash
image

subtree pull 变成:
git subtree pull --prefix=testing testing master --squash
image

【在subtreetest下更新testing,再push上】

现在subtreetest 下更新 testing 目录下的文件
image

要push 回去的话:
git subtree push --prefix=testing testing master
image
回到testing 下
git pull
就能看到更新了!
image

好了!

2013年11月6日星期三

[教程][C#][算法] A* 寻路算法入门——详解 + 实现

玩网游的自动寻路是不是很帅?网上有一些破解迷宫的程序,是不是很帅?
给定一个有多个节点的路径的图形,A*算法(读做A星算法)是求从一点到另一点的最低成本的算法(也就是最短的路径,当然这里“最短”是相对的)。
这篇文章非常基本,专门给像我这种刚刚入门的新手。

【区域分割】

假设说我们有一副图:
image

现在有一个人在绿色的地方
然后红色的地方是墙壁(不能通过)
然后那个人要一最短的时间从绿色的地方 走到 紫色的地方

为了方便,我们把开始的地方(绿色部分)取名为A点
结束(紫色部分)为B点

问题简化为:找出从A点直B点最短的路径。
那要怎么搜索呢?

看过地板上的地砖么?地砖是不是把整个地板分成了一格一格的?
所以我们把我们的地图(就叫做地图吧)分割成一格一格的,像这样:
image

那样是不是方便多了?
这些一格一格的“地砖”叫做“节点”,分割搜索区域是寻路简单化,而且可以直接将其储存进一个二维数组内。
寻路算法就是找出能从A到B的方格,然后这些方格就组成了我们所需要的“路径”
找出路径之后,那个人就能从A点走到B点了(废话..)
你当然可以把整个地图分成不同的形状:三角形、正方形、矩形等等
但是为了方便起见,在这里我们就用矩形吧!

【开始搜索】

把搜索区域化成一堆节点后,就是开始搜索了!
要如何搜索?
1、从A点开始,把A点加入一个“开放列表”
开放列表中的方格可能会是待会儿会经过的路径,也可能不是
当前的开放列表之中只有A点一个
2、检查A点相邻的方格,让后将它们也一起加入开放列表之中(相邻的都要加入,别管那个节点能不能通过)
对于每一个相邻的方格,将A点设为他们的“父亲”,这点很重要
3、从开放列表去掉A,加入“封闭列表”内

最后得到的是这样:
image

黄色框的是在“开放列表”之中
白色框的是在“封闭列表”之中

4、接下来就是从开放列表之中选一个相邻的方格,然后在重复步骤
那么,要选哪一个方格呢?
选F最小的那个!

【计算F值】

F = G + H
F值决定那个方格会成为路径
这里的:
G = 从A点开始到当前的点所需要的移动开销
H = 从当前方格到目的地方格的估计移动开销。

【计算G值】

G值是从A点开始到当前的点所需要的开销
当前的点就是那些相邻的方格
在这里:
水平/垂直移动的开销 = 10
对角线移动的开销 = 14
怎么算出来的?
很简单,就是一个边长为1的直角三角形呗!
image
只是在这里全部都乘10,这会让电脑轻松些

【计算H值】

有很多方法可以估算H值
这里用的叫做 Manhattan 方法,它并不考虑路途中的任何障碍物
H = 当前的点与目的地点的垂直距离 + 当前的点与目的地点的水平距离
像这样:
image
所以F = G + H

这里左上角是F
左下角是G
右下角是H

image

【继续搜索】

1、我们从开放列表之中选择拥有最小F值的方格
2、从开放列表之中将其移除,加入到封闭列表之中
3、检测该方格所有的相邻方格,计算F值。
1、忽略那些已经在封闭列表之中的方格
2、如果有相邻方格在开放列表之中,依旧计算其F值,然后与之前计算过的F值比较,如果当前的F值小,覆盖之前计算出来的F值,并将其的父方格设为当前方格
4、将相邻的方格的父方格设置为当前方格
来看看例子

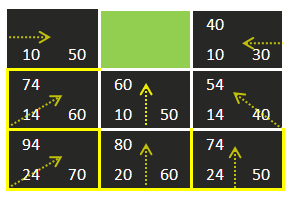
在这里坐标(2,2)的方格拥有最小的F值(40)
所以我们选择它,然后将其放入封闭列表之中
image
现在它的右边、右上角、右下角是墙,左边的起始方格已经在封闭列表之中了,所以忽略
现在只剩下4个待检测的方格——左上角、左下角、上、下
那些方格都已经在开放列表之中了
所以我们计算然后比较他们的F值
先忽略之前计算过的F值
我们得到的F值是:
(注意G值的变化)
image
可是他们都比之前算出来的F值大
所以我们都忽略现在计算出来的F值,用回之前计算的F值
image

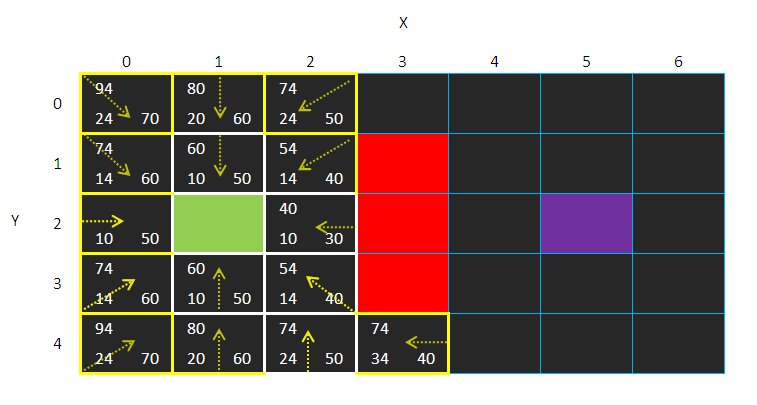
现在我们的开放列表只剩下7个方格了
有最小F值的方格有两个,但是选那个都没有关系
我们就选(2,3)吧!
从开放列表中移除,加入封闭列表之中
image

然后计算相邻方格的F值
加入开放列表,比较F值,然后设置父方格:
image
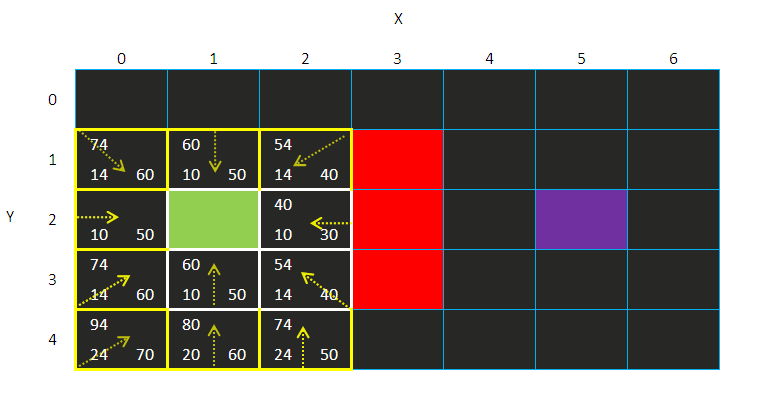
发现到没?
我没有直接检测墙下的方格(3,4)
这事能设定的
如果你不要有人能直角穿过墙角的话,当遇到墙壁时,就不要检测对角的方格
那个方格留给别个方格

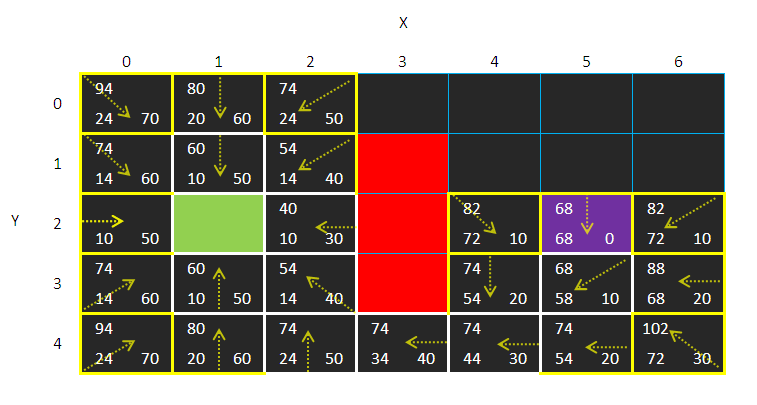
然后搜索继续:
image
有没有发现到(1,4)的方格的父方格变化了?
本来是(2,3)的
image
变成了(1,3)
image
原因是F值更加小了 (之前的 88 和 80)
很明显的路径(1,2)-> (2,3) –> (1,4)比路径(1,2)-> (1,3)->(1,4)更长
我们要最短的路径嘛!

继续搜索:
接下来就不详解了
步骤都一样的
image
image
image
image
image
到这里
目的地方格已经有父方格了
如何找出路径呢?
只要中目的地方格沿着走到下一个父方格,一直到起始方格就好了!
先这样:
image

【C#实现】

整个C#实现A* 寻路算法的代码我推到GitHub 上去了:
https://github.com/garyng/PathFinding
这里的代码仅供参考
不一定是最好、最优的
这个是Node class
代表每一个节点
using System;
using System.Collections.Generic;
using System.Text;
using System.Drawing;

namespace PathFinding
{
public class Node
{

private int _h;
private const int _count = 8; //properties count - for indexing
private Point _pos;
private Node _parent;
private int _g;
private Node _dLeft;
private int _f;
private Node _uLeft;
private Node _dRight;
private Node _uRight;
private Node _down;
private Node _up;
private Node _right;
private Node _left;
private bool _isWall;

public Node()
{
this.Left = null;
this.Right = null;
this.Down = null;
this.Up = null;
this.URight = null;
this.ULeft = null;
this.DLeft = null;
this.DRight = null;
}

public Node(Node left, Node right, Node down, Node up, Node uRight, Node dRight, Node uLeft, Node dLeft)
{
this.Left = left;
this.Right = right;
this.Down = down;
this.Up = up;
this.URight = uRight;
this.ULeft = uLeft;
this.DLeft = dLeft;
this.DRight = dRight;
}

private Node SwitchNodeProp(int index, Node value = null)
{
switch (index)
{
case 0:
//Up
return ReturnNodeProp(ref _up,value);
case 1:
//URight
return ReturnNodeProp(ref _uRight, value);
case 2:
//Right
return ReturnNodeProp(ref _right, value);
case 3:
//DRight
return ReturnNodeProp(ref _dRight, value);
case 4:
//Down
return ReturnNodeProp(ref _down, value);
case 5:
//DLeft
return ReturnNodeProp(ref _dLeft, value);
case 6:
//Left
return ReturnNodeProp(ref _left, value);
case 7:
//ULeft
return ReturnNodeProp(ref _uLeft, value);
}
return null;
}

private Node ReturnNodeProp(ref Node Prop, Node value = null)
{
if (value == null)
{
return Prop;
}
else
{
Prop = value;
return null;
}
}

public Node this[int index]
{
get
{
return SwitchNodeProp(index);
}
set
{
SwitchNodeProp(index, value);
}
}

public int Count
{
get
{
return _count;
}
}
public bool isWall
{
get
{
return _isWall;
}
set
{
_isWall = value;
}
}
public Node Left
{
get
{
return _left;
}
set
{
_left = value;
}
}
public Node Right
{
get
{
return _right;
}
set
{
_right = value;
}
}
public Node Up
{
get
{
return _up;
}
set
{
_up = value;
}
}
public Node Down
{
get
{
return _down;
}
set
{
_down = value;
}
}
public Node URight
{
get
{
return _uRight;
}
set
{
_uRight = value;
}
}
public Node DRight
{
get
{
return _dRight;
}
set
{
_dRight = value;
}
}
public Node ULeft
{
get
{
return _uLeft;
}
set
{
_uLeft = value;
}
}
public Node DLeft
{
get
{
return _dLeft;
}
set
{
_dLeft = value;
}
}
public int F
{
get
{
return _f;
}
set
{
_f = value;
}
}
public int G
{
get
{
return _g;
}
set
{
_g = value;
}
}
public int H
{
get
{
return _h;
}
set
{
_h = value;
}
}
public Node Parent
{
get
{
return _parent;
}
set
{
_parent = value;
}
}
public Point Pos
{
get
{
return _pos;
}
set
{
_pos = value;
}
}
}
}


每一个节点的相邻方格储存在相应的属性内

并且可以直接以index 来获取:

image


这个是初始化一个二维Node 数组的代码:
private void InitNodes(ref List<List<Node>> nodes)
{
for (int x = 0; x < _width; x++)
{
List<Node> nX = new List<Node>();
for (int y = 0; y < _height; y++)
{
Node nY = new Node();
nY.Pos = new Point(x, y);
//nY.F = x * 100 + y;
//Up
if (y > 0)
{
nY.Up = nX[y - 1];
nX[y - 1].Down = nY;
}
//Left
if (x > 0)
{
nY.Left = nodes[x - 1][y];
nodes[x - 1][y].Right = nY;
}
//UpLeft
if (x > 0 && y > 0)
{
nY.ULeft = nodes[x - 1][y - 1];
nodes[x - 1][y - 1].DRight = nY;
}
//DownLeft
if (x > 0 && y < (_height - 1))
{
nY.DLeft = nodes[x - 1][y + 1];
nodes[x - 1][y + 1].URight = nY;
}
nX.Add(nY);
}
nodes.Add(nX);
}
}


这个是核心寻路算法:
private void FindPath(ref List<List<Node>> nodes, Node start, Node end)
{
List<Node> open = new List<Node>();
List<Node> close = new List<Node>();

open.Add(start);

while (open.Count > 0)
{

close.Add(open[0]);
Node pendingNode = open[0];
open.RemoveAt(0);

for (int i = 0; i < pendingNode.Count; i++)
{
Node current = pendingNode[i];
if (current == null || current.Equals(start) || current.isWall)
{
continue;
}
int h;
int g;
int f;

if (i % 2 == 0)
{
//Up Right Down Left
g = pendingNode.G + 10;
}
else
{
// URight DRight DLeft ULeft

//check for walls
//|X
//|_
if (pendingNode[(i + 1) % 8].isWall || pendingNode[i - 1].isWall)
{
continue;
}

g = pendingNode.G + 14;
}

h = (Math.Abs(end.Pos.X - current.Pos.X) + Math.Abs(end.Pos.Y - current.Pos.Y)) * 10;
f = h + g;
if (f < current.F || current.F == 0)
{
current.G = g;
current.H = h;
current.F = f;
current.Parent = pendingNode;
open.Add(current);
}
if (current.Equals(end))
{
List<Node> paths = new List<Node>();
Node path = end;
while (path.Parent != null)
{
paths.Add(path);
path = path.Parent;
}
open.Clear();
VisualizePath(paths);
break;
}
}
open = open.OrderBy(item => item.F).ToList();
}

}


注:这里没有实现“忽略已经在封闭列表中的节点”


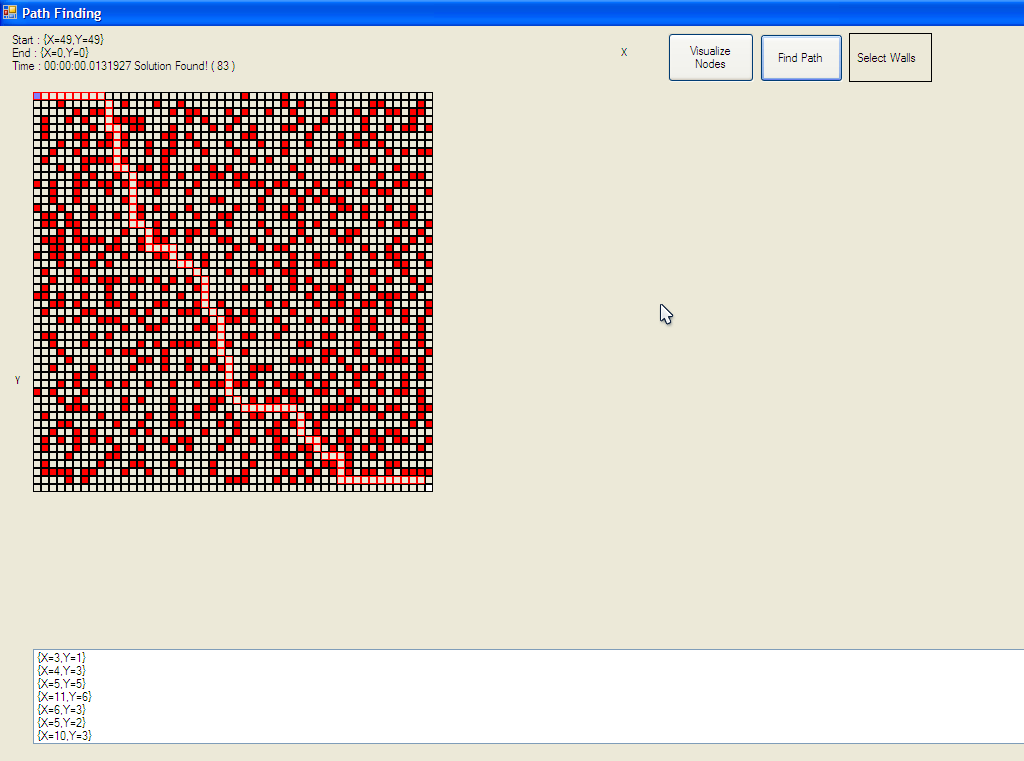
【截图】


无图无真相,所以就发图:

红色的是墙壁

白色的是起始点

蓝色的是终点
image

2013年10月11日星期五

[教程][Blogger][C#] Blogger API v3 教程#8——更改帖子标题

【这个系列中..】

[教程][Blogger][C#] Blogger API v3教程#1 —— 前言
[教程][Blogger][C#] Blogger API v3 教程#2 —— 申请 Blogger API 的使用权限
[教程][Blogger][C#] Blogger API v3 教程#3 —— 获取API Key、Client ID 和 Client Secret
[教程][Blogger][C#] Blogger API v3 教程#4 —— 设置开发环境、安装插件、添加Reference
[教程][Blogger][C#] Blogger API v3 教程#5 —— 获取Blog Id
[教程][Blogger][C#] Blogger API v3 教程#6——OAuth 2.0 认证
[教程][Blogger][C#] Blogger API v3 教程#7——获取帖子列表
[教程][Blogger][C#] Blogger API v3 教程#8——更改帖子标题

Blogger 有一个API 叫做blogger.pages.update
对应.net 库PostsResource中的.Update() 函数
返回一个PostsResource.UpdateRequest 类型
image


先拿出其中一个post:
Post postUpdate = postsListReq.Execute().Items[0];


然后更改标题:
postUpdate.Title = "Title Changed";


创建一个UpdateRequest
然后执行.Execute()

PostsResource.UpdateRequest blogUpdate = postRes.Update(postUpdate, blog.Id, postUpdate.Id);
blogUpdate.Execute();


完整代码如下:
using System;
using System.Collections.Generic;
using System.Linq;
using System.Text;
using System.Threading.Tasks;

using Google.Apis.Blogger.v3;
using Google.Apis.Blogger.v3.Data;
using Google.Apis.Services;
using System.Diagnostics;
using Google.Apis.Authentication.OAuth2;
using Google.Apis.Authentication.OAuth2.DotNetOpenAuth;
using DotNetOpenAuth.OAuth2;
using Google.Apis.Util;


namespace BloggerTest
{
class Program
{
static void Main(string[] args)
{
string apiKey= "{API-KEY}";
string blogUrl= "{BLOG-URL}";

string clientID = "{CLIENT_ID}";
string clientSec = "{CLIENT_SECRET}";

NativeApplicationClient provider = new NativeApplicationClient(GoogleAuthenticationServer.Description)
{
ClientIdentifier = clientID,
ClientSecret = clientSec
};

OAuth2Authenticator<NativeApplicationClient> auth = new OAuth2Authenticator<NativeApplicationClient>(provider, getAuth);

BloggerService blogService = new BloggerService(new BaseClientService.Initializer()
{
Authenticator = auth,
ApplicationName = "BloggerTest"
});


BlogsResource.GetByUrlRequest getReq = blogService.Blogs.GetByUrl(blogUrl);
getReq.Key = apiKey;
Blog blog = getReq.Execute();

Console.WriteLine("Blog ID: " + blog.Id);
Console.WriteLine();

PostsResource postRes = new PostsResource(blogService);
PostsResource.ListRequest postsListReq = postRes.List(blog.Id);

string firstToken = "";

while (true)
{
PostList posts = postsListReq.Execute();
postsListReq.PageToken = posts.NextPageToken;

if (firstToken == "")
{
firstToken = posts.NextPageToken;
}
else if (firstToken != "" && posts.NextPageToken == firstToken)
{
// repeated
break;
}

for (int i = 0; i < posts.Items.Count; i++)
{
Console.WriteLine("Title: " + posts.Items[i].Title);
Console.WriteLine("URL: " + posts.Items[i].Url);
}

}

Post postUpdate = postsListReq.Execute().Items[0];
postUpdate.Title = "Title Changed";

PostsResource.UpdateRequest blogUpdate = postRes.Update(postUpdate, blog.Id, postUpdate.Id);
blogUpdate.Execute();

Console.WriteLine();
Console.WriteLine("Done...");

Console.ReadKey();


}

private static IAuthorizationState getAuth(NativeApplicationClient arg)
{
IAuthorizationState state = new AuthorizationState(new[] { BloggerService.Scopes.Blogger.GetStringValue() })
{
Callback = new Uri(NativeApplicationClient.OutOfBandCallbackUrl)
};
Uri authUri = arg.RequestUserAuthorization(state);
Process.Start(authUri.ToString());
Console.WriteLine("Please enter auth code:");
string authCode = Console.ReadLine();
return arg.ProcessUserAuthorization(authCode, state);
}


}
}


运行结果:

image

【后记】

这应该是这个系列的最后一个帖子了..当然还有很多API我没示范..
还有整个系列的完整源码我已经发在 Github 上了:

https://github.com/garyng/BloggerAPIv3Samples

[教程][Blogger][C#] Blogger API v3 教程#7——获取帖子列表

【这个系列中..】

[教程][Blogger][C#] Blogger API v3教程#1 —— 前言

[教程][Blogger][C#] Blogger API v3 教程#2 —— 申请 Blogger API 的使用权限

[教程][Blogger][C#] Blogger API v3 教程#3 —— 获取API Key、Client ID 和 Client Secret

[教程][Blogger][C#] Blogger API v3 教程#4 —— 设置开发环境、安装插件、添加Reference

[教程][Blogger][C#] Blogger API v3 教程#5 —— 获取Blog Id

[教程][Blogger][C#] Blogger API v3 教程#6——OAuth 2.0 认证

[教程][Blogger][C#] Blogger API v3 教程#7——获取帖子列表

[教程][Blogger][C#] Blogger API v3 教程#8——更改帖子标题


【获取帖子列表】

有BlogID 了万事好办..
Blogger API的数据模型是这样的:
image_thumb[3]
Blogs Resource 下有Posts Resource
所以我们创建一个PostsResource变量,传入blogService
PostsResource postsRes = new PostsResource(blogService);

 
有一API 叫做 posts.list
image_thumb[4]
 
如上面的GetByUrl Request 一般,PostsResource 也有ListRequest
呼叫PostsResouce 里面的 .List函数,返回一个PostsResource.ListRequest
然后呼叫PostsResource.ListRequest 的.Execute()函数,返回一个PostList 类型

PostsResource postsRes = new PostsResource(blogService);
PostsResource.ListRequest postsListReq = postsRes.List(blog.Id);
PostList posts = postsListReq.Execute();

Blogger API 默认返回10个posts,储存在Post.Items中
现在在遍历.Items 然后输出post的 Title

for (int i = 0; i < posts.Items.Count; i++)
{
Console.WriteLine(posts.Items[i].Title);
}


完整代码:

using System;
using System.Collections.Generic;
using System.Linq;
using System.Text;
using System.Threading.Tasks;

using Google.Apis.Blogger.v3;
using Google.Apis.Blogger.v3.Data;
using Google.Apis.Services;
using System.Diagnostics;
using Google.Apis.Authentication.OAuth2;
using Google.Apis.Authentication.OAuth2.DotNetOpenAuth;
using DotNetOpenAuth.OAuth2;
using Google.Apis.Util;


namespace BloggerTest
{
class Program
{
static void Main(string[] args)
{
string apiKey= "{API-KEY}";
string blogUrl= "{BLOG-URL}";

string clientID = "{CLIENT_ID}";
string clientSec = "{CLIENT_SECRET}";

NativeApplicationClient provider = new NativeApplicationClient(GoogleAuthenticationServer.Description)
{
ClientIdentifier = clientID,
ClientSecret = clientSec
};

OAuth2Authenticator<NativeApplicationClient> auth = new OAuth2Authenticator<NativeApplicationClient>(provider, getAuth);

BloggerService blogService = new BloggerService(new BaseClientService.Initializer()
{
Authenticator = auth,
ApplicationName = "BloggerTest"
});


BlogsResource.GetByUrlRequest getReq = blogService.Blogs.GetByUrl(blogUrl);
getReq.Key = apiKey;
Blog blog = getReq.Execute();

Console.WriteLine("Blog ID: " + blog.Id);
Console.WriteLine();

PostsResource postRes = new PostsResource(blogService);
PostsResource.ListRequest postsListReq = postRes.List(blog.Id);
PostList posts = postsListReq.Execute();

for (int i = 0; i < posts.Items.Count; i++)
{
Console.WriteLine(posts.Items[i].Title);
}

Console.WriteLine();
Console.WriteLine("Done...");

Console.ReadKey();


}

private static IAuthorizationState getAuth(NativeApplicationClient arg)
{
IAuthorizationState state = new AuthorizationState(new[] { BloggerService.Scopes.Blogger.GetStringValue() })
{
Callback = new Uri(NativeApplicationClient.OutOfBandCallbackUrl)
};
Uri authUri = arg.RequestUserAuthorization(state);
Process.Start(authUri.ToString());
Console.WriteLine("Please enter auth code:");
string authCode = Console.ReadLine();
return arg.ProcessUserAuthorization(authCode, state);
}


}
}


输出结果:

image


【获取所有帖子】


PostList 里面有个.PageToken和.NextPageToken、.PrevPageToken

基本上,含义是这样:

unnamed1


所以我们要遍历所有的帖子的话,

要把.PageToken 设置为 NextPageToken

然后还要检测当前的PageToken是否为第一个的PageToken (因为我们已经获取过了,所以不用获取了),如果是的话,就break 出 while loop

所以把之前代码中的

PostList posts = postsListReq.Execute();

删除掉

现在定义一个string为 firstToken

用来储存第一个NextPageToken

string firstToken = "";


现在就是while loop

现在就是while loop

while (true)
{
PostList posts = postsListReq.Execute();
postsListReq.PageToken = posts.NextPageToken;

if (firstToken == "")
{
firstToken = posts.NextPageToken;
}
else if (firstToken != "" && posts.NextPageToken == firstToken)
{
// repeated
break;
}

for (int i = 0; i < posts.Items.Count; i++)
{
Console.WriteLine("Title: " + posts.Items[i].Title);
Console.WriteLine("URL: " + posts.Items[i].Url);
}

}


}


完整代码:

using System;
using System.Collections.Generic;
using System.Linq;
using System.Text;
using System.Threading.Tasks;

using Google.Apis.Blogger.v3;
using Google.Apis.Blogger.v3.Data;
using Google.Apis.Services;
using System.Diagnostics;
using Google.Apis.Authentication.OAuth2;
using Google.Apis.Authentication.OAuth2.DotNetOpenAuth;
using DotNetOpenAuth.OAuth2;
using Google.Apis.Util;


namespace BloggerTest
{
class Program
{
static void Main(string[] args)
{
string apiKey= "{API-KEY}"
string blogUrl= "{BLOG-URL}"

string clientID = "{CLIENT_ID}";
string clientSec = "{CLIENT_SECRET}";

NativeApplicationClient provider = new NativeApplicationClient(GoogleAuthenticationServer.Description)
{
ClientIdentifier = clientID,
ClientSecret = clientSec
};

OAuth2Authenticator<NativeApplicationClient> auth = new OAuth2Authenticator<NativeApplicationClient>(provider, getAuth);

BloggerService blogService = new BloggerService(new BaseClientService.Initializer()
{
Authenticator = auth,
ApplicationName = "BloggerTest"
});


BlogsResource.GetByUrlRequest getReq = blogService.Blogs.GetByUrl(blogUrl);
getReq.Key = apiKey;
Blog blog = getReq.Execute();

Console.WriteLine("Blog ID: " + blog.Id);
Console.WriteLine();

PostsResource postRes = new PostsResource(blogService);
PostsResource.ListRequest postsListReq = postRes.List(blog.Id);

string firstToken = "";

while (true)
{
PostList posts = postsListReq.Execute();
postsListReq.PageToken = posts.NextPageToken;

if (firstToken == "")
{
firstToken = posts.NextPageToken;
}
else if (firstToken != "" && posts.NextPageToken == firstToken)
{
// repeated
break;
}

for (int i = 0; i < posts.Items.Count; i++)
{
Console.WriteLine("Title: " + posts.Items[i].Title);
Console.WriteLine("URL: " + posts.Items[i].Url);
}

}

Console.WriteLine();
Console.WriteLine("Done...");

Console.ReadKey();


}

private static IAuthorizationState getAuth(NativeApplicationClient arg)
{
IAuthorizationState state = new AuthorizationState(new[] { BloggerService.Scopes.Blogger.GetStringValue() })
{
Callback = new Uri(NativeApplicationClient.OutOfBandCallbackUrl)
};
Uri authUri = arg.RequestUserAuthorization(state);
Process.Start(authUri.ToString());
Console.WriteLine("Please enter auth code:");
string authCode = Console.ReadLine();
return arg.ProcessUserAuthorization(authCode, state);
}


}
}


输出结果:

image

[教程][Blogger][C#] Blogger API v3 教程#5 —— 获取Blog Id

【这个系列中..】

[教程][Blogger][C#] Blogger API v3教程#1 —— 前言
[教程][Blogger][C#] Blogger API v3 教程#2 —— 申请 Blogger API 的使用权限
[教程][Blogger][C#] Blogger API v3 教程#3 —— 获取API Key、Client ID 和 Client Secret
[教程][Blogger][C#] Blogger API v3 教程#4 —— 设置开发环境、安装插件、添加Reference
[教程][Blogger][C#] Blogger API v3 教程#5 —— 获取Blog Id
[教程][Blogger][C#] Blogger API v3 教程#6——OAuth 2.0 认证
[教程][Blogger][C#] Blogger API v3 教程#7——获取帖子列表
[教程][Blogger][C#] Blogger API v3 教程#8——更改帖子标题

【获取API Key】

还记得API Key 我们现在需要用到:
登录这边获取API Key:https://code.google.com/apis/console/b/0/?noredirect
1、在API Access 找到 Simple API Access
image

2、记下API Key

【获取Blog ID】

blogID 和 postID 是最重要的,很多API操作都需要用到它
blogID 可以以Blog URL 来获取,所以我们创建两个string
一个储存API Key, 另一个储存blog URL
string apiKey = "{YOUR-API-KEY}";
string blogUrl = "{YOUR-BLOG-URL}";

要用到Blogger API 就需要创建一个Blogger Service,里面传入一个Initializer 参数:
BloggerService blogService = new BloggerService(new BaseClientService.Initializer()); 
Google APIs Explorer 里面有一个API 是:
image
 
所以从blogUrl 获取blogID的API 就会在BloggerService 下的 Blogs.GetByURL()
而Google 的 getByUrl referece(https://developers.google.com/blogger/docs/3.0/reference/blogs/getByUrl
说GetByUrl 会返回一个GetByUrl
对应.net 的BlogResource.GetByUrlRequest
还需要执行.Execute()函数才能开始获取blogID
.Execute() 函数返回一个Blog类型
记得必须给GetUrlRequest 的变量传入API Key,要不然不会收到任何回复的
BloggerService blogService = new BloggerService(new BaseClientService.Initializer());
BlogsResource.GetByUrlRequest getReq = blogService.Blogs.GetByUrl(blogUrl);
getReq.Key = apiKey;
Blog blog = getReq.Execute();
然后返回的blog 变量里面就有一个参数叫Id,里面储存的就是Blog 的 ID了
Console.WriteLine(blog.Id);
完整代码如下:
using System;
using System.Collections.Generic;
using System.Linq;
using System.Text;
using System.Threading.Tasks;
using Google.Apis.Blogger.v3;
using Google.Apis.Blogger.v3.Data;
using Google.Apis.Services;
using System.Diagnostics;
using Google.Apis.Authentication.OAuth2;
using Google.Apis.Authentication.OAuth2.DotNetOpenAuth;
using DotNetOpenAuth.OAuth2;
using Google.Apis.Util;

namespace BloggerTest
{
class Program
{
static void Main(string[] args)
{
string apiKey = "{API-KEY}";
string blogUrl = "{BLOG-URL}";

BloggerService blogService = new BloggerService(new BaseClientService.Initializer());

BlogsResource.GetByUrlRequest getReq = blogService.Blogs.GetByUrl(blogUrl);
getReq.Key = apiKey;
Blog blog = getReq.Execute();
Console.WriteLine(blog.Id);

Console.ReadKey();

}
}
}


当你第一次编译运行时,可能会出现这个Open File Dialog
image
 
找到下载回来的API dot net client 代码
去到Src/GoogleApis/Apis/Requests/
点击Open 就行了
image
 
PS:似乎不用这个file 也可以编译..
运行结果
image
 

[教程][Blogger][C#] Blogger API v3 教程#6——OAuth 2.0 认证

【这个系列中..】

[教程][Blogger][C#] Blogger API v3教程#1 —— 前言
[教程][Blogger][C#] Blogger API v3 教程#2 —— 申请 Blogger API 的使用权限
[教程][Blogger][C#] Blogger API v3 教程#3 —— 获取API Key、Client ID 和 Client Secret
[教程][Blogger][C#] Blogger API v3 教程#4 —— 设置开发环境、安装插件、添加Reference
[教程][Blogger][C#] Blogger API v3 教程#5 —— 获取Blog Id
[教程][Blogger][C#] Blogger API v3 教程#6——OAuth 2.0 认证
[教程][Blogger][C#] Blogger API v3 教程#7——获取帖子列表
[教程][Blogger][C#] Blogger API v3 教程#8——更改帖子标题

至于OAuth 是啥,这里不做详细介绍
就是类似这样的东东:
image

1、先到这边获取Client Id 和 Client Secret :https://code.google.com/apis/console/b/0/?noredirect
image

2、创建两个string,储存Client ID 和 Secret
string clientID = "{CLIENT-ID}";
string clientSec = "{CLIENT-SECRET}";


3、Google Code Page 这里有个OAuth2.0 的 .net 版本例子,我们照搬改点东西就好了:
image

所以我们只要改一改我们的BloggerService 再加上一个function就行了:
先创建NativeApplicationClient
NativeApplicationClient provider = new NativeApplicationClient(GoogleAuthenticationServer.Description)
{
ClientIdentifier = clientID,
ClientSecret = clientSec
};

然后是增加一个函数
private static IAuthorizationState getAuth(NativeApplicationClient arg)
{
IAuthorizationState state = new AuthorizationState(new [] {BloggerService.Scopes.Blogger.GetStringValue()})
{
Callback = new Uri(NativeApplicationClient.OutOfBandCallbackUrl)
};
Uri authUri = arg.RequestUserAuthorization(state);
Process.Start(authUri.ToString());
Console.WriteLine("Please enter auth code:");
string authCode = Console.ReadLine();
return arg.ProcessUserAuthorization(authCode, state);
}


创建OAuth2Authenticator
OAuth2Authenticator<NativeApplicationClient> auth = new OAuth2Authenticator<NativeApplicationClient>(provider, getAuth);


然后更改BloggerService
BloggerService blogService = new BloggerService(new BaseClientService.Initializer()
{
Authenticator = auth,
ApplicationName = "BloggerTest"
});

完整代码如下:
using System;
using System.Collections.Generic;
using System.Linq;
using System.Text;
using System.Threading.Tasks;
using Google.Apis.Blogger.v3;
using Google.Apis.Blogger.v3.Data;
using Google.Apis.Services;
using System.Diagnostics;
using Google.Apis.Authentication.OAuth2;
using Google.Apis.Authentication.OAuth2.DotNetOpenAuth;
using DotNetOpenAuth.OAuth2;
using Google.Apis.Util;

namespace BloggerTest
{
class Program
{
static void Main(string[] args)
{
string apiKey= "{API-KEY}";
string blogUrl= "{BLOG-URL}";

string clientID = "{CLIENT_ID}";
string clientSec = "{CLIENT_SECRET}";

NativeApplicationClient provider = new NativeApplicationClient(GoogleAuthenticationServer.Description)
{
ClientIdentifier = clientID,
ClientSecret = clientSec
};

OAuth2Authenticator<NativeApplicationClient> auth = new OAuth2Authenticator<NativeApplicationClient>(provider, getAuth);

BloggerService blogService = new BloggerService(new BaseClientService.Initializer()
{
Authenticator = auth,
ApplicationName = "BloggerTest"
});

BlogsResource.GetByUrlRequest getReq = blogService.Blogs.GetByUrl(blogUrl);
getReq.Key = apiKey;
Blog blog = getReq.Execute();
Console.WriteLine(blog.Id);

Console.ReadKey();

}

private static IAuthorizationState getAuth(NativeApplicationClient arg)
{
IAuthorizationState state = new AuthorizationState(new[] { BloggerService.Scopes.Blogger.GetStringValue() })
{
Callback = new Uri(NativeApplicationClient.OutOfBandCallbackUrl)
};
Uri authUri = arg.RequestUserAuthorization(state);
Process.Start(authUri.ToString());
Console.WriteLine("Please enter auth code:");
string authCode = Console.ReadLine();
return arg.ProcessUserAuthorization(authCode, state);
}
}
}


编译运行后,程序会开启一个页面:
点击Accept
image


然后就有一长串字符,Copy 了 paste 进程序内 ([教程] 如何在CMD中Copy & Paste
image

然后照常输出blog id
image

PS:Auth code 会过期的!